fbpx
Three big ravioli sit on crumpled parchment paper. We see the edge of a wooden ravioli mold off to the right.

How to Use a Ravioli Mold

Written by Sarah Ubertaccio and Emilie Pullar. Photos by Emilie Pullar.

This post was originally published in our email newsletter. Sign up here to get recipes, guides, and product news delivered directly to your inbox.


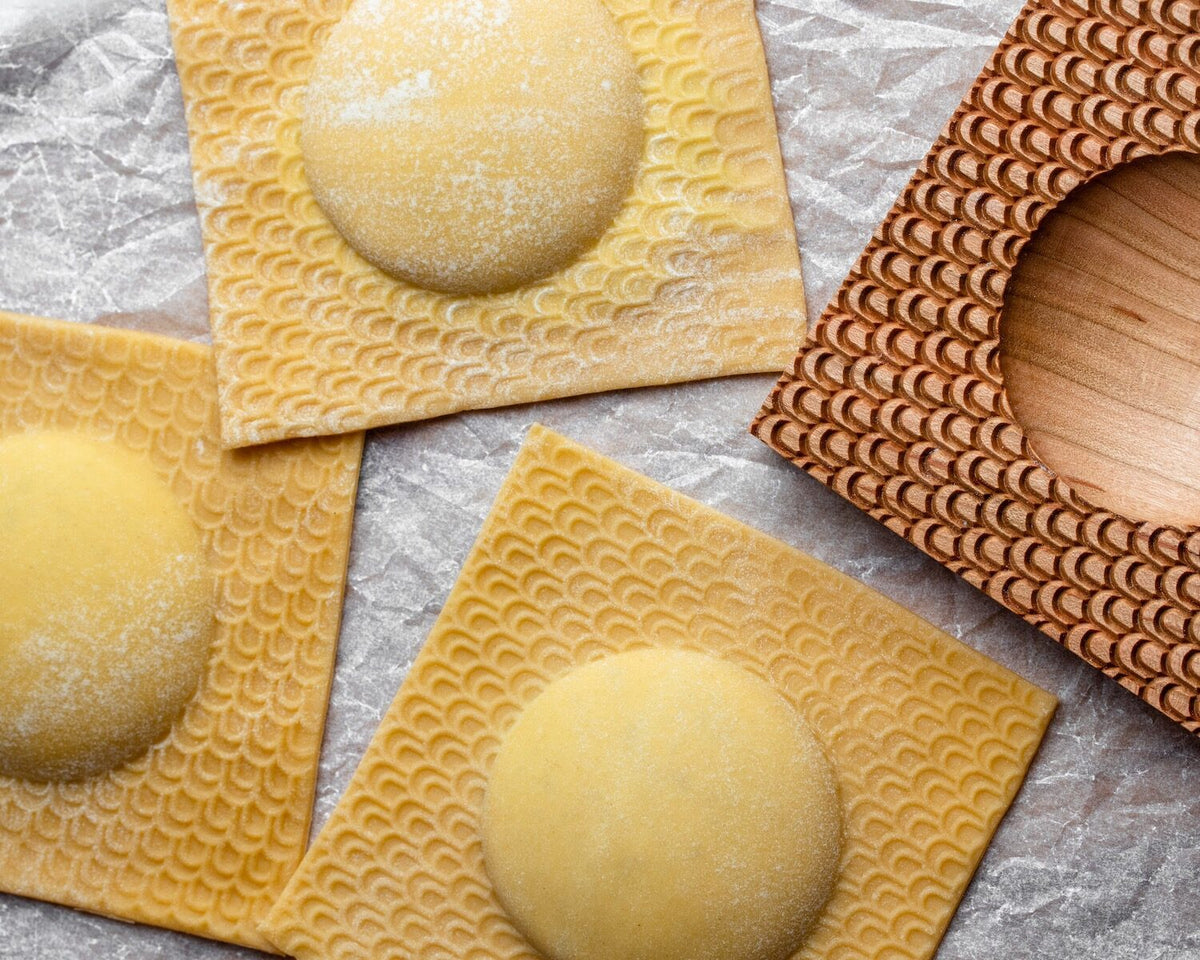
Not long ago we launched our first-ever ravioli mold in collaboration with woodworker, John Francis Designs. We’ve been working on this mold since last February and now that it’s finally here, we’re excited to dive deep into ravioli-making.

To help with this endeavor, we turned to Emilie Pullar of The Burnt Butter Table and asked for her help on putting together a guide on using ravioli molds. She’s churned out dozens of these ravioli on her Instagram feed – always with a gorgeous set of long, manicured nails (how she does it I just don’t know but I’ve got serious nail envy).

After chatting with Emilie and reading her tips, we all agreed that using a ravioli mold may seem daunting at first, but that it’s actually rather simple and results in an impressive-looking pasta.

So without further ado, here is Emilie’s ravioli mold guide. Be sure to check out her Pesto-Ricotta Filled Raviolo with Brown Butter Sage Sauce recipe, too.

How to Use a Ravioli Mold: Tips & Tricks

Tips for the Filling

  • Once you’ve made your filling, put it into a piping bag or Ziploc bag. Using a piping bag makes it easier and quicker to fill the ravioli.
  • When making the filling for your ravioli, make sure there aren’t any clumps or chunky ingredients, which could get stuck as the fillilng comes out of your piping bag. Use a food processor to achieve a smooth filling.
  • Not sure what to fill them with? A combination of ricotta and grated Parmigiano Reggiano is always a good choice. You can add spinach, mushrooms, or even pesto to this too! Just make sure you’ve drained as much liquid as possible from your vegetables and that it’s well blended into a smooth consistency.
  • Another tip? Place the filling in the fridge to chill for at least 30 minutes. This will make it easier to pipe and you’ll be able to move the ravioli around easier.

Tips for the Dough

  • Although an all-yolk dough is rich and decadent, it’s not as pliable. When making ravioli (and other shapes that you need to stretch and fold) it’s best to have a few whole eggs in your dough, since the egg whites add water and thus, plasticity. Here’s our go-to dough recipe for ravioli.
  • Roll out sheets of pasta to the appropriate thickness. On a Kitchen Aid Roller and Marcato Atlas 150 Pasta Machine, we prefer setting 7. Remember that you’ll have two layers, the top and bottom, so you don’t want it to be too thick, but you also want it to be thick enough to stretch in the mold.
Ravioli mold process
Giant raviolo made with a wooden mold

Tips for Shaping Your Ravioli

  • If the dough feels sticky when you roll it out, sprinkle it with a little 00 flour (a very light dusting will do!). If it’s too dry and isn’t sealing properly, use a fine mist spray bottle to mist a little water over the edges that you want to seal.
  • Cut your pasta sheets into squares just bigger than the size of the mold. Having some overhang is ideal because it will ensure that your ravioli fill the entire space of the mold.
  • Brush one of the squares with 00 flour and then place the flour side down into the mold. There’s a fine line where the dough needs to be floured enough to not stick, but not so floured that it fills in the grooves in the mold and you lose detail. If the pasta sticks in the mold, flip it upside down and give the bottom of the mold a few taps with a rolling pin until the pasta falls out.
  • Use a dry pastry brush to lightly press into the space the filling will go into. Pipe your filling into the middle, then press down and smooth with a teaspoon so that it’s level with the top of the mold.
  • Place the second square on top and press lightly with your hands. Roll with a rolling pin then flip over and press down really firmly with your hands. This will ensure you get the design imprinted on the mold.
  • Peel the raviolo off the mold, don’t panic if it sticks, you might just need to dust the first sheet with more flour next time.
  • Cut off the edges with a knife or pizza cutter. For more a decorative look, use a fluted wheel on the edges.

Ready to get started? Snag one of our Reversible Wooden Ravioli Molds and check out this recipe for pesto-ricotta filled ravioli.

Sale Sold Ravioli Pasta Necklace in Yellow Gold
, ,

Original price was: $100.00.Current price is: $75.00.

Post a Comment